I have learned and re-learned Ansible a few times now. RedHat has made a lot of breaking changes over the years and some of those are hard to keep up with. Today is March 19, 2021 and here is what you need to get started with Ansible in the networking world. This will teach you how to setup a Python virtual environment dedicated to Ansible, install Ansible, run ad-hoc commands, and lastly run a simple playbook.
I do most of my ‘development’ on my Linux based desktop. I use CentOS 8 at home. Before you do anything, you will need to install Python3 on CentOS8. This will install Python 3.6.8 which will get you going. I will do another post on how to install and use specific Python versions on CentOS in the future. Really, Python3 on any Linux system should work.
sudo dnf install python3Most guides you will find will tell you to install Ansible using yum or dnf. That can get you started but will provide you with an older version of Ansible. Right now yum provides version 2.9.18-1. The current release is 2.10.7.
We’re going to use Python to install Ansible. The later versions of Python3 come with some built in components which allow us to do that. venv and pip. venv is a virtual environment manager which allows you have isolated Python environments. venv allows you to keep your dependencies for your automation project separate from your system wide Python packages. Pip is Pythons built in package manager. Python has many non-standard libraries that can be downloaded and used, including Ansible!
To get started, create your working directory. The directory where you are going to keep all of your automation files and navigate to that directory.
mkdir network-automationcd network-automationNow we need to create the Python virtual environment which allows us to run the most recent version Ansible in an isolated Python environment. In English -> Python3 -MODULE venv in the directory venv
python3 -m venv venvValidate the the virtual environment has been created.
[user@computer network-automation]$ ls
Now you need to activate or basically log into the virtual environment.
source venv/bin/activateYour prompt should change to look like the following:
(venv) [user@computer network-automation]$You are now inside of the Python virtual environment! From here we need to install Ansible and some other supporting packages. To do this we use pip. Remember to make sure you are inside of your virtual environment so that you do not install any packages that conflict with the underlying system Python. The first two lines are needed to upgrade pip itself. Don’t worry too much about what they do just do it to make your life easier. After that we install Ansible and NAPALM. Without looking too far into it, I do not know if NAPALM is still needed or if its included in a dependency somewhere but in this case it does not hurt to have it.
pip install --upgrade wheel
pip install --upgrade pip

pip install ansible
pip install napalm
Validate that Ansible is indeed installed.
(venv) [user@computer network-automation]$ ansible --version
ansible 2.10.7
  config file = None
  configured module search path = ['/home/justin/.ansible/plugins/modules', '/usr/share/ansible/plugins/modules']
  ansible python module location = /home/justin/network-automation/venv/lib64/python3.6/site-packages/ansible
  executable location = /home/justin/network-automation/venv/bin/ansible
  python version = 3.6.8 (default, Aug 24 2020, 17:57:11) [GCC 8.3.1 20191121 (Red Hat 8.3.1-5)]
Ansible recently separated the core functionality of Ansible and the modules into individual components. Quickly install these modules to get up and running. We might cover these in more detail one day. Just know they need to be installed separately. We wont need all of these in this example but it’s good to know they exist should you be using other vendors.
ansible-galaxy collection install ansible.netcommon
ansible-galaxy collection install cisco.ios
ansible-galaxy collection install junipernetworks.junos
ansible-galaxy collection install arista.eos
To get started with Ansible you first need to create an inventory file. Create a file simply named hosts and add the following content to it.
vi hosts
...
[all:vars]
ansible_connection=ansible.netcommon.network_cli
ansible_network_os=cisco.ios.ios
ansible_user=admin
ansible_password=P@55w0Rd
ansible_python_interpreter=/home/user/network-automation/venv/bin/python


[routers:children]
ios_routers

[ios_routers]
csr9 ansible_host=172.31.32.209
csr10 ansible_host=172.31.32.210
This is a fairly simple Ansible Inventory file. It contains one group – ‘ios_routers’ which is a child group of ‘routers’. All groups are members of the ‘all’ group. Configurations that are applied in my ‘all’ group can be applied anywhere in the configuration. You can specifiy user and password per group or per device. If you have a Juniper device you may use a different ansible_connection. We will dive into that in another post. For now, I assume you are using Cisco IOS or Cisco IOS-XE and only have a couple devices.
Next, we need to create a local Ansible configuration file. Ansible has some global defaults that make it more secure but a little harder to use. In the same directory as your hosts file, which should be ‘network-automation’ you need to create an ansible.cfg file. Here is what mine looks like:
vi ansible.cfg

[defaults]
host_key_checking = False

[paramiko_connection]
look_for_keys = False
host_key_auto_add = True
record_host_keys=True

[persistent_connection]
connect_timeout = 60
The configuration file has section outlined by […] and individual configuration options under each section. All of the options are outlined here but here is the rundown on these 5 options.
- HOST_KEY_CHECKING – Set this to “False” if you want to avoid host key checking by the underlying tools Ansible uses to connect to the host
- PARAMIKO_LOOK_FOR_KEYS – Not defined in documentation – Likely ignores existing accepted keys on the local system
- PARAMIKO_HOST_KEY_AUTO_ADD – Not defined in documentation – Adds known host keys automatically. Does not require you to manually add them first
- RECORD_HOST_KEYS – The default setting of yes will record newly discovered and approved (if host key checking is enabled) hosts in the user’s hostfile. This setting may be inefficient for large numbers of hosts, and in those situations, using the ssh transport is definitely recommended instead. Setting it to False will improve performance and is recommended when host key checking is disabled:
- PERSISTENT_COMMAND_TIMEOUT – When communicating with a remote device, you have control over how long Ansible maintains the connection to that device, as well as how long Ansible waits for a command to complete on that device. Some network devices or some outputs can take long periods of time to return the needed information.
You are now ready to run give Ansible a shot. In English -> “Ansible, all hosts, ping module, using the inventory file ‘hosts'”
ansible all -m ping -i hostsThe ping module is NOT ICMP ping, this is just a trivial test module that requires Python on the remote-node. However, when Ansible connects to network devices, modules and their Python are executed locally to your Ansible server so in this case we are not actually testing reachability to the network devices.
Instead we need to use another module – netcommon.net_ping to connect to the routers and have them ping an address on your network. In English -> Ansible, all hosts, Ansible Netcommon Net_ping module with arguments 'dest=127.0.0.1' using the inventory file 'hosts'. Replace 127.0.0.1 with a known destination on your network.
ansible all -m ansible.netcommon.net_ping -a "dest=127.0.0.1" -i hostsBoth of these commands are what is known as ad-hoc commands. Type them out, run them once. They quick and dirty but can still be useful in some cases. The only problem with them is that they are not reusable or very easy to remember.
Enter Playbooks! Ansible Playbooks are YAML files which describe the actions Ansible should perform or the state it should enforce each time that playbook is executed. To get started we can look at our two ad-hoc commands. We can turn these into plays or playbooks and have them ready and waiting at our finger tips if we need to use them again.
A playbook can be named anything you want it to be but a descriptive name is probably best. Well start with ‘ping.yaml’
vi ping.yaml

---
- name: Ping hosts
  hosts: all
  gather_facts: false

  tasks:
    - name: Ping hosts using builtin ping
      ansible.builtin.ping:
If we breakdown this playbook. It is a playbook with a single task.
---This is a YAML formality. Just do it.
 - name: Ping hosts
   hosts: all
   gather_facts: false
– name: Ping hosts – This is the name of the Playbook. It displays when the playbook is run.
hosts: all – This specifies which host or groups this playbook should be run against.
gather_facts: false – By default, Ansible will connect to its managed hosts and capture important pieces of information about the current state of the hosts. This information helps determine what need to be run and what does not to enforce the state. In the networking world – WE ALWAYS SET THIS TO FALSE – Ansible does not have a built in method of gathering facts from network devices. Each vendor has their own facts module that we will dive into later. For now, just set this to false.
tasks:
  - name: Ping hosts using builtin ping
    ansible.builtin.ping:
tasks: – Under this section will be a YAML list of tasks and all of their arguments
- name: – This is the name of the individual task in the playbook. This should be unique per task
ansible.builtin.ping: – This is the name of the module.
Ansibles builtin ping module doesn’t accept any arguments so there is nothing else to add. But now let’s look at Ansible Netcommon Netping module and add it to our Playbook.
vi ping.yaml

---
- name: Ping hosts
  hosts: all
  gather_facts: false

  tasks:
    - name: Ping hosts using builtin ping
      ansible.builtin.ping:

    - name: Ping hosts using netping
      ansible.netcommon.net_ping:
        dest: 1.1.1.1
Now you see that a playbook can have multiple tasks. To run this playbook type the following into your terminal:
ansible-playbook ping.yaml -i hosts
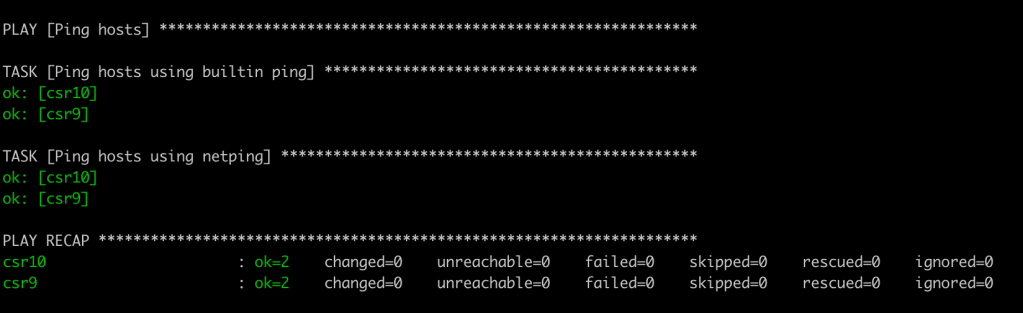
You should get a result that looks like this! In the Ansible world green is good. There isn’t a lot of detail here so this isn’t very useful yet. In another post we will explore debugging and returning useful information.
